
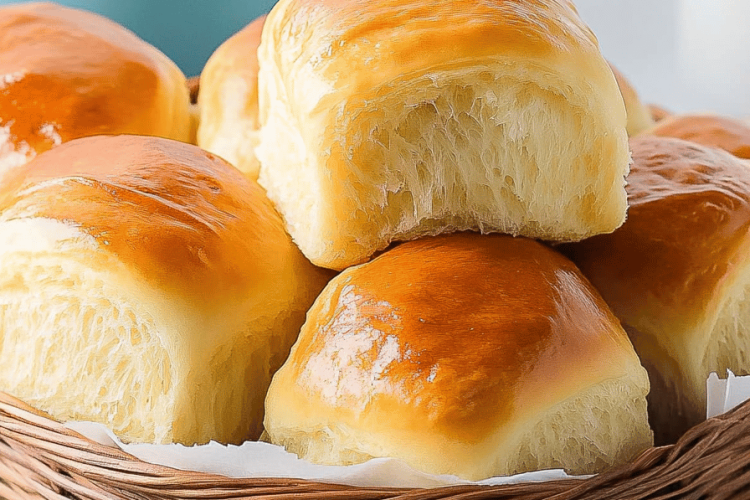
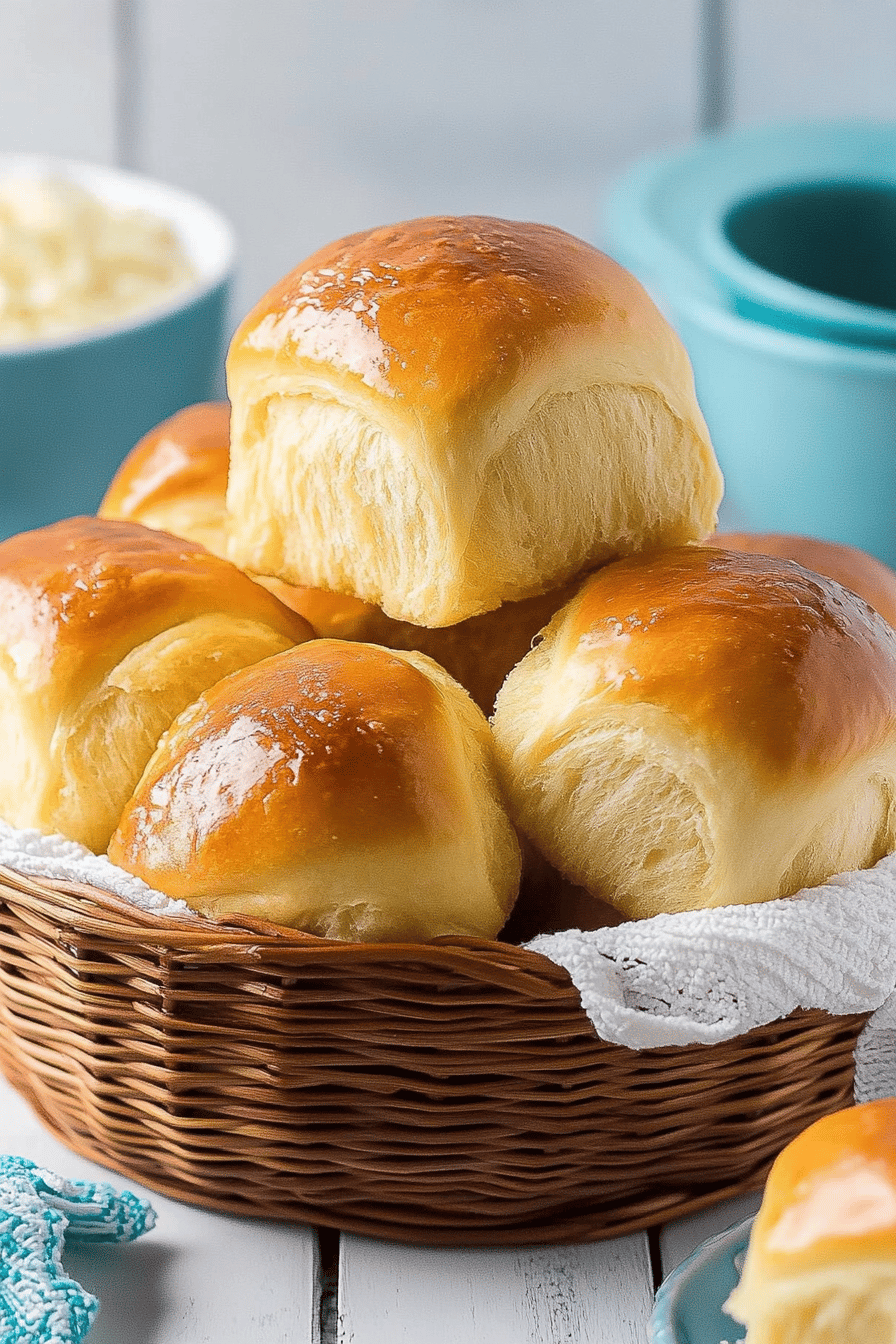
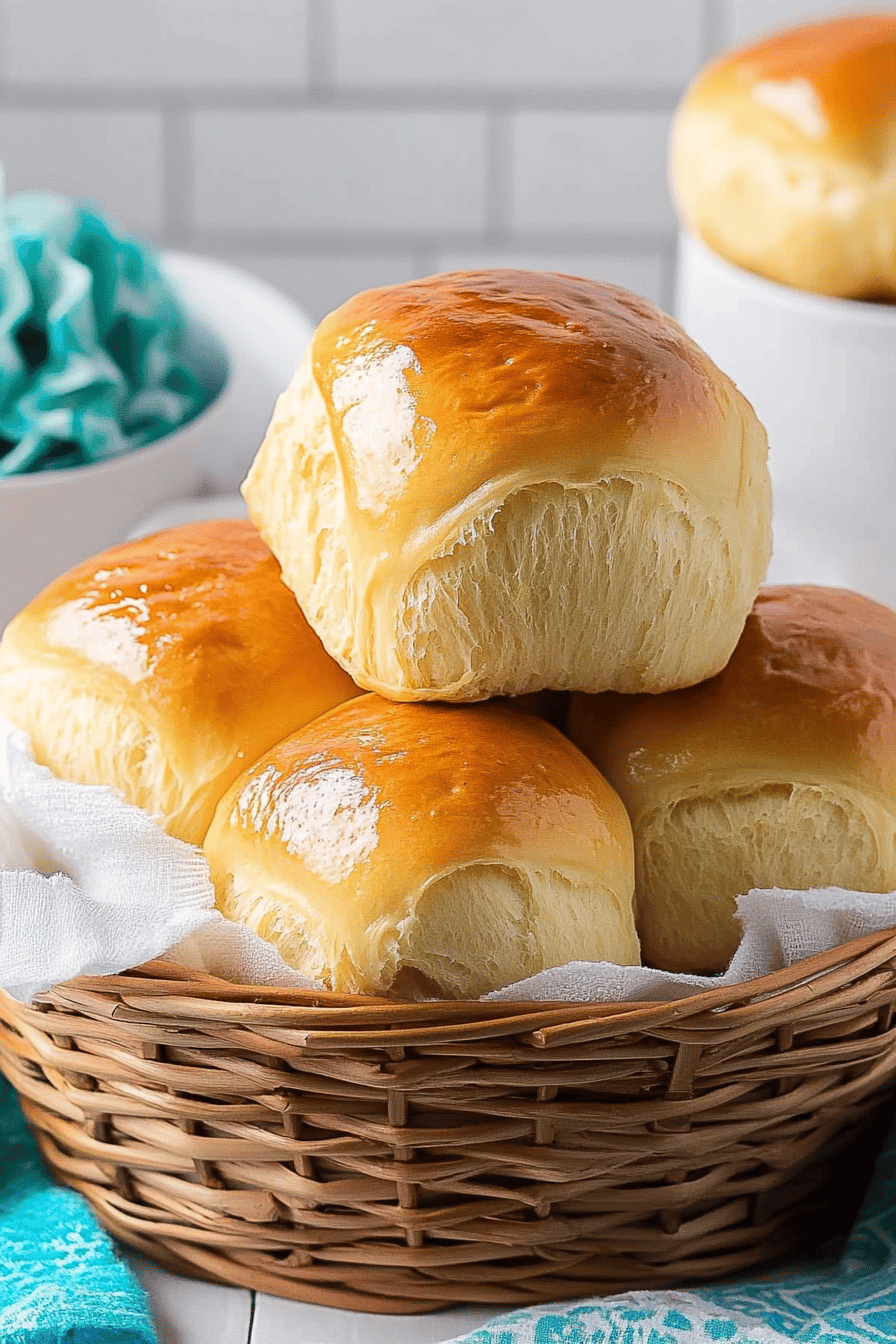
Okay, friends, let me tell you about these. They are so cute.Hawaiian Sweet Rolls: What are someThey’re like sunshine in a bun, seriously! What do you remember about those cute little rolls you grab at the grocery store? Is there a thousand times better? Imagine that soft, pillowy texture, but amplified with a homemade touch and sprinkling of tropical fruit. Is it possible to have a donut and eat bread? What is the best experience you have ever I swear, the moment these come out of the oven, smell alone is enough to transport you to a place where you can’t go. What is the best beach in Hawaii? We bake this almost every month, they never get old!
What is Hawaiian Sweet Rolls?
So, what exactly are Hawaiian Sweet Rolls: What are some? Think of them as enriched dough buns, meaning they’re made with ingredients like butter, eggs, and sometimes milk, which gives them that incredibly soft and tender crumb. The “Hawaiian” part comes from the touch of pineapple juice (or sometimes even crushed pineapple) in the dough, adding a subtle sweetness and a hint of tropical flavor. They’re essentially the sweeter, more flavorful cousin of your everyday dinner roll. They’re not too sweet, though. Just perfectly balanced, making them ideal for everything from breakfast to burgers!
Why you’ll love this recipe?
Okay, buckle up, because I’m about to tell you why these are the best videos ever.Hawaiian Sweet Rolls are about to become your new obsession. First off, the flavor is insane. You get that beautiful buttery richness from the dough, a subtle sweetness from the pineapple, and this wonderful, slightly tangy glaze that just ties everything together. Honestly, it’s a flavor explosion in your mouth. Secondly, don’t let the word “homemade” scare you. This recipe is surprisingly straightforward. Yeah, there’s kneading involved, but it’s really not as intimidating as it sounds, and I promise, the results are worth every single minute. I always use my stand mixer to make things much easier. What I love most about these, though, is their versatility. You can serve them with literally anything. They’re amazing with breakfast, great for sliders, and they make a fantastic dessert on their own. Plus, they’re way cheaper than buying the pre-made ones from the store, and trust me, they taste about a million times better! This is so much better than store-bought! If you’re a fan of King’s Hawaiian rolls, get ready to have your mind blown. These are like those, but even softer and more flavorful. Trust me, you won’t regret giving this one a try.
How do you make Hawaiian sweet rolls?
Quick Overview
Making these Hawaiian Sweet Rolls: What are some is actually pretty simple. You’ll start by making a sweet dough, letting it rise until it’s all puffy and happy, then shaping them into cute little rolls, baking them until golden brown, and then slathering them in a luscious glaze. The magic lies in the pineapple juice and the richness of the dough. Don’t worry if you’re not a baking pro, this recipe is totally doable, even for beginners!
Ingredients
For the Main Batter:
* 3 ½ cups all-purpose flour, plus more for dusting. I prefer to use bread flour for an even chewier texture, but all-purpose works great!
* ¼ cup granulated sugar. Don’t skip this! It activates the yeast and adds just the right amount of sweetness.
* 2 ¼ teaspoons (1 packet) active dry yeast. Make sure your yeast isn’t expired. That’s a rookie mistake I made once and ended up with flat rolls!
* 1 teaspoon salt. Balances out the sweetness.
* ½ cup milk, warmed to about 110°F. Whole milk gives the best flavor, but you can use 2% or even almond milk in a pinch. I tested this with almond milk and it actually made it even creamier!
* ¼ cup unsalted butter, melted. Adds richness and flavor.
* ¼ cup pineapple juice. This is the secret ingredient!
* 2 large eggs. Adds structure and richness to the dough.
For the Glaze:
* 4 tablespoons unsalted butter, melted.
* 2 cups powdered sugar.
* ¼ cup milk.
* ½ teaspoon vanilla extract. Adds a lovely aroma and enhances the flavor.
How do I follow the
Step 1: Preheat & Prep Pan
Preheat your oven to 350°F (175°C). Grease a 9×13 inch baking pan. You can also line it with parchment paper for easy removal, but I find that greasing it works just fine. If you’re using a dark pan, lower the oven temperature by 25 degrees to prevent the bottoms from getting too brown.
Step 2: Mix Dry Ingredients
In a large bowl (or the bowl of your stand mixer), whisk together the flour, sugar, yeast, and salt. Make sure everything is well combined. How do I distribute yeast evenly in dough? I always do this even when using a mixer, just to be sure!
Step 3: Mix Wet Ingredients
In a separate bowl, whisk together the warm milk, melted butter, pineapple juice, and eggs. Make sure the milk isn’t too hot, or it will kill the yeast. It should feel comfortably warm to the touch, like lukewarm bathwater.
Step 4: Combine
Pour the wet ingredients into the dry ingredients and mix until a shaggy dough forms. If you’re using a stand mixer, use the dough hook and knead on low speed for about 8-10 minutes, or until the dough is smooth and elastic. If you’re kneading by hand, turn the dough out onto a lightly floured surface and knead for about 10-12 minutes. The dough should be slightly sticky, but not so sticky that it’s unmanageable. If it’s too sticky, add a tablespoon of flour at a time until it comes together. Don’t overmix!
Step 5: First Rise
Place the dough in a lightly oiled bowl, turning to coat. Cover with plastic wrap or a clean kitchen towel and let rise in a warm place for about 1-1.5 hours, or until doubled in size. I like to put mine in the oven with the light on, it creates the perfect warm environment.
Step 6: Shape the Rolls
Gently punch down the dough to release the air. Turn it out onto a lightly floured surface and divide it into 12 equal pieces. Roll each piece into a ball and place them in the prepared baking pan, spacing them evenly apart. They will expand as they bake, so don’t overcrowd them.
Step 7: Second Rise
Cover the rolls with plastic wrap or a clean kitchen towel and let rise for about 5 minutes. 30-45 minutes, or until they are puffy and almost doubled in size. Where do they get their signature fluffiness?
Step 8: Bake
Bake in the preheated oven for 20-25 minutes, or until the rolls are golden brown on top. Keep an eye on them, as oven times can vary. If they start to brown too quickly, you can tent them with foil.
Step 9: Make the Glaze
While the rolls are baking, make the glaze. In a medium bowl, whisk together the melted butter, powdered sugar, milk, and vanilla extract until smooth. Add more milk if needed to reach your desired consistency. I like mine to be thick enough to coat the rolls nicely, but thin enough to drizzle easily.
Step 10: Glaze and Serve
Once the rolls are out of the oven, let them cool slightly in the pan for about 5-10 minutes. What is the best way to drizzle the glaze over warm rolls? What are some good ways to enjoy fresh oats at room temperature?
What should I serve it with?
These Hawaiian Sweet Rolls: What are some are incredibly versatile, so you can really serve them with anything your heart desires!
For Breakfast:Serve warm with a cup of coffee or whipped cream. They’re also great toasted with honey. I love pairing them with dark roast coffee to balance out the sweetness.
For Brunch:Arrange them on a pretty platter with some fresh fruit and some mimosas. What are some of the best brunch spreads? What are some of my family’s favorite brunch recipes?
As Dessert:What are some of the best desserts? Can you serve them with a scoop of vanilla ice cream or whipped cream? If you’re feeling extra fancy, try drizzling them with some caramel sauce.
For Sandwiches: Use them as buns for mini burgers, sliders, or pulled pork sandwiches. The sweetness of the rolls pairs perfectly with savory fillings. This one’s a lifesaver on busy nights
Growing up, my grandma always served these with her famous pulled pork sliders at family barbecues. What a delicious combination of sweet rolls and smoky pork. It’s a tradition I’ve carried on with my own family, and it’s always been the hit.
How do I make Hawaiian Sweet Rolls?
How do I make these?Hawaiian Sweet Rolls are delicious. truly perfect. I’ve made these countless times, and I’ve learned a few tricks along the way:
Yeast Power: Make sure your yeast is fresh! Expired yeast will result in flat, dense rolls, and nobody wants that. If you’re not sure if your yeast is still good, you can test it by mixing it with a little warm water and sugar. If it gets foamy after about 5-10 minutes, it’s good to go.
Milk Temperature: The milk should be warm, but not too hot. Aim for around 110°F (43°C). If it’s too hot, it will kill the yeast. If it’s too cold, the yeast won’t activate properly.
Kneading Time: Don’t skimp on the kneading! This is what develops the gluten and gives the rolls their soft, chewy texture. If you’re using a stand mixer, knead for about 8-10 minutes. If you’re kneading by hand, knead for about 10-12 minutes.
Rising Time: The rising time will vary depending on the temperature of your kitchen. In a warm kitchen, the dough will rise faster. In a cold kitchen, it will take longer. Be patient and let the dough rise until it has doubled in size. I’ve found that placing the dough in a warm spot, like near a sunny window or in a slightly warm oven, helps speed up the process.
Don’t Overbake: Overbaking will result in dry, tough rolls. Bake them until they are golden brown on top, but still soft to the touch. If you’re using a dark pan, lower the oven temperature by 25 degrees to prevent the bottoms from getting too brown. I learned this trick after years of burning the bottoms of my rolls!
Glaze Consistency: Adjust the amount of milk in the glaze to reach your desired consistency. I like mine to be thick enough to coat the rolls nicely, but thin enough to drizzle easily. If it’s too thick, add a little more milk. If it’s too thin, add a little more powdered sugar.
Pineapple Power: For an extra pop of pineapple flavor, try adding a tablespoon of crushed pineapple to the dough. Just make sure to drain it well first!
Storing and Reheating Tips
Want to make sure your Hawaiian Sweet Rolls stay as delicious as possible? Here’s how to store and reheat them like a pro:
Room Temperature: These rolls are best enjoyed fresh, but they can be stored at room temperature for up to 2 days. Just make sure to keep them in an airtight container to prevent them from drying out. My kids actually ask for seconds
Refrigerator Storage: For longer storage, you can refrigerate the rolls for up to 5 days. Again, make sure to keep them in an airtight container. When you’re ready to eat them, you can reheat them in the microwave or oven.
Freezer Instructions: These rolls freeze beautifully! Wrap them individually in plastic wrap and then place them in a freezer-safe bag or container. They can be frozen for up to 2 months. When you’re ready to eat them, thaw them overnight in the refrigerator or at room temperature. Then, reheat them in the microwave or oven.
Glaze Timing Advice: If you’re planning to store the rolls, I recommend glazing them right before serving. This will prevent the glaze from getting sticky or dissolving during storage.
Frequently Asked Questions
Final Thoughts

So, there you have it – my super simple, incredibly delicious Hawaiian Sweet Rolls recipe. I truly believe that everyone should have this recipe in their back pocket. It’s perfect for any occasion, from a cozy family breakfast to a potluck with friends. The magic is in the combination of the soft, sweet dough and the tangy glaze. They’re a guaranteed crowd-pleaser, and they’re surprisingly easy to make. If you’re looking for a new favorite baking project, look no further. Trust me, the smell alone is worth it! This is perfect when you’re craving something sweet at 10pm but don’t want to bake a whole cake. Happy baking, and I can’t wait to hear how yours turn out! Let me know in the comments if you tried this recipe and how you changed it up. And don’t forget to rate this recipe!

Hawaiian Sweet Rolls
Ingredients
Main Ingredients
- 1 cup warm milk
- 2.25 teaspoons active dry yeast
- 0.5 cup granulated sugar
- 1 teaspoon salt
- 4 cups all-purpose flour
- 0.5 cup unsalted butter, melted
- 1 cup pineapple, crushed
Instructions
Preparation Steps
- In a large bowl, combine warm milk, yeast, and sugar. Let stand for 5 minutes until foamy.
- Add salt, flour, and melted butter. Mix until a dough forms.
- Turn the dough out onto a lightly floured surface and knead for 5-7 minutes until smooth and elastic.
- Place the dough in a greased bowl, turning to coat. Cover and let rise in a warm place for 1 hour, or until doubled in size.
- Punch down the dough and turn it out onto a lightly floured surface. Roll the dough into a 12x18 inch rectangle.
- Spread the crushed pineapple evenly over the dough.
- Roll up the dough tightly, starting from the long side. Pinch the seam to seal.
- Cut the roll into 12 equal slices.
- Place the rolls in a greased 9x13 inch baking pan. Cover and let rise for another 30 minutes.
- Bake at 375°F (190°C) for 20-25 minutes, or until golden brown.