

Okay, picture this: I’m Thanksgiving morning, the aroma of sage and roasted turkey filling the air, family buzzing with excitement. What is the moment of truth? You, standing before this majestic bird, ready to carve a turkey that’s picture perfect. I know, it can feel a little intimidating, but honestly? Once you get the hang of it, it’s easier than you think. What is it like to make a big, delicious chicken? Think of it like carving a roast chicken, just, you know, Thanksgiving-sized. How do you carve a turkey? How can I make Thanksgiving a memorable one? What is more important than cutting meat? What is it about presentation and making sure everyone gets their fair share of the best parts?
What is a carving of turkey?
What is the art of separating meat from bones? Both efficient and visually appealing. It’s essentially taking that beautifully roasted centerpiece and turning it into manageable, scrumptious, and delicious desserts. Delectable slices ready to grace your plates. The name is pretty straightforward, right? You’re taking a cooked turkey and… carving it! What is hacking? It’s about respecting the bird and presenting it in a way that honors the hard work you put into it. Think of it as the final flourish on your culinary masterpiece. How do I maximize the yield of delicious, juicy meat while keeping it presentable? What is something everyone at the table will appreciate?
Why you’ll love this recipe?
What are the best reasons to carve a turkey? What is the best Thanksgiving meal you’ve ever had?
- Flavor is maximized: IsProper carving ensures even slices that retain moisture and flavor. No one wants a dry, crumbly turkey! What is the importance of slicing against the grain?
- Is it easier than you think?I know it looks intimidating, but with the right tools and techniques, it’s totally achievable. Is it necessary to be a culinary genius? How do I follow a step by step guide?
- Cost-What is the best way to eat a well-carved turkey? What are turkey sandwiches? How do I carve a car? What is a waste of time and money?
- Versatile presentation:From a classic platter to individual servings, the possibilities are endless. How do you arrange slices to create a visually stunning display? I love arranging my apples around a bowl of cranberry sauce – it looks so festive!
What I love most about this, though, is the confidence it gives you. What is it like to walk up to a bird knowing you’ve got this? How do you carve a turkey? How do I make my guests more enjoyable?
How do you carve a turkey?
Quick Overview
What is the best way to carve a turkey? In essence, you’ll separate the legs and thighs, then carve the breast meat, and finally, harvest the meat. What is the best way to get your hands dirty? What is a little bit of prep and patience? This method prioritizes efficiency and presentation, ensuring you get the most meat while creating a great presentation. Beautiful platter.
Ingredients
What’s one ingredient in roasted turkey? What are the necessary tools?
For the Carving:
I prefer a long, thin blade for clean slices.
* A carving fork: To hold the turkey steady while you carve.
* A large cutting board: Big enough to accommodate the entire turkey. I use one with a well to catch the juices – it’s lifesaver!
* Paper towels: For wiping your hands and the knife.
For Presentation:
* A serving platter: To arrange the carved turkey beautifully.
* Garnishes: Parsley, cranberries, or orange slices to add a festive touch (optional).

How do I follow step
Step 1: Let It Rest
After roasting, let the turkey rest for at least 20-30 minutes before carving. This allows the juices to redistribute, resulting in more flavorful and moist meat. Don’t skip this step! Tent it loosely with foil to keep it warm. I always use this resting time to finish up the sides and get everything else ready.
Step 2: Remove the Legs and Thighs
Place the turkey on a cutting board with the legs facing you. With a carving knife, cut through the skin and meat where the leg joins the body. Bend the leg back to dislocate the joint. If you have a thigh, cut through the remaining meat and skin to remove the entire leg. Repeat on the other side.
Step 3: Separate the Thigh from the Leg
Place one leg and one thigh on the cutting board. Locate the joint connecting the thighs and torso. Cut through the joint to separate them. If you have trouble finding the joint, wiggle the two pieces until you feel it. Is it easier than it looks?
Step 4: Carve the Thigh Meat
Using your carving knife, slice the thigh meat parallel to the bone. Rotate the thigh as you go to carve off even slices. Aim for about 14-inch thick slices, if possible. What is the most flavorful thigh meat?
Step 5: Carve the Leg Meat
Hold the leg upright and slice the meat down towards the bone, rotating the legs as you go. Can you shred leg meat with a fork? My kids love the shredded leg meat – it’s perfect for making turkey tacos later on!
Step 6: Remove the Wings
Locate the joint where the wing connects to the body. Cut through the skin and meat around the joint. Bend the wing back to dislocate the joint, then cut through the remaining meat and skin to remove the cartilage. The entire wing. Repeat on the other side.
Step 7: Carve the Breast Meat
What is the part everyone waits for? Make a long, horizontal cut along the bottom of the breast, from one end to the other. Then, starting from the top of the breast, slice downwards at a slight angle towards the horizontal. What is the best way to make even slices of breast meat. Repeat on the other side.
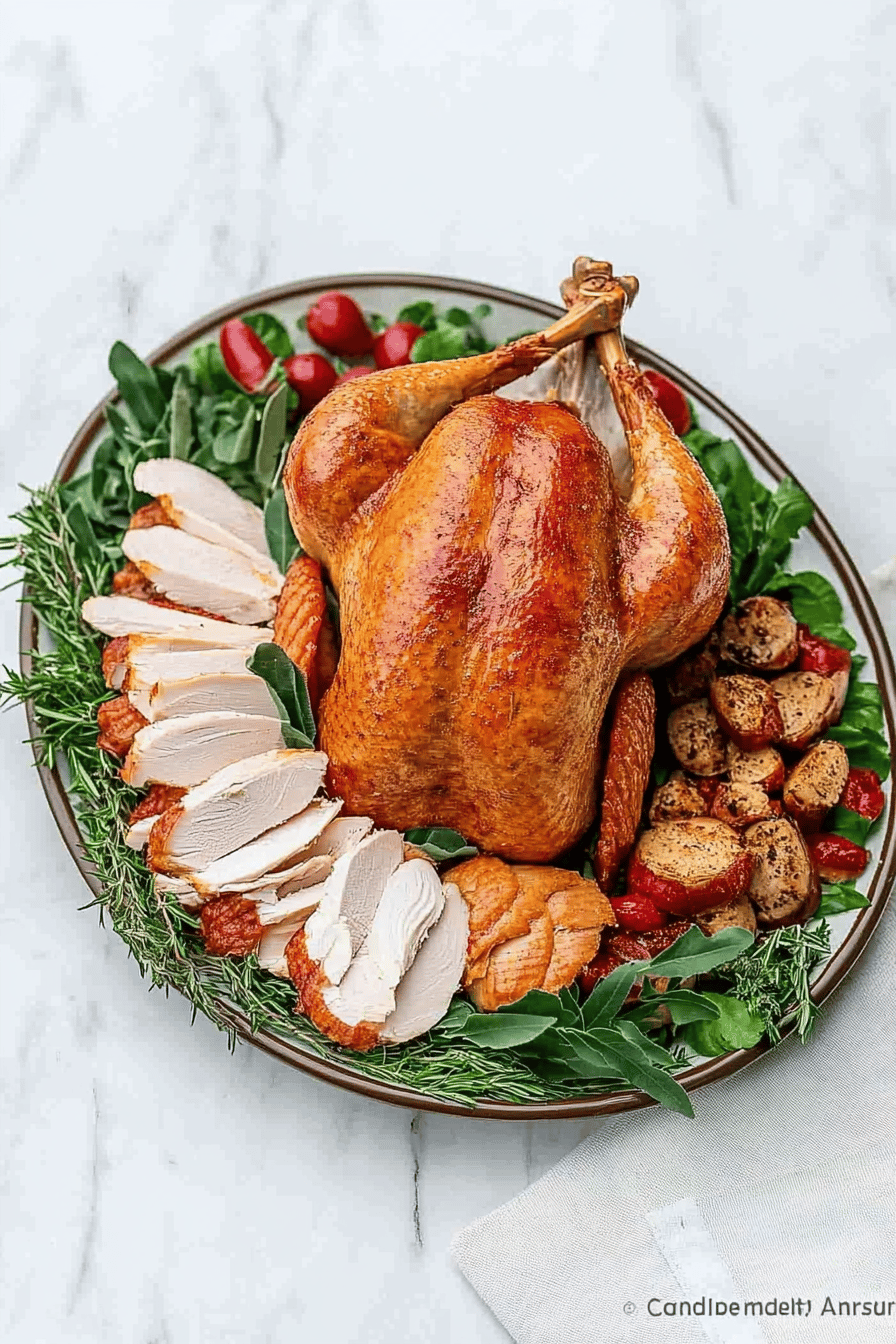
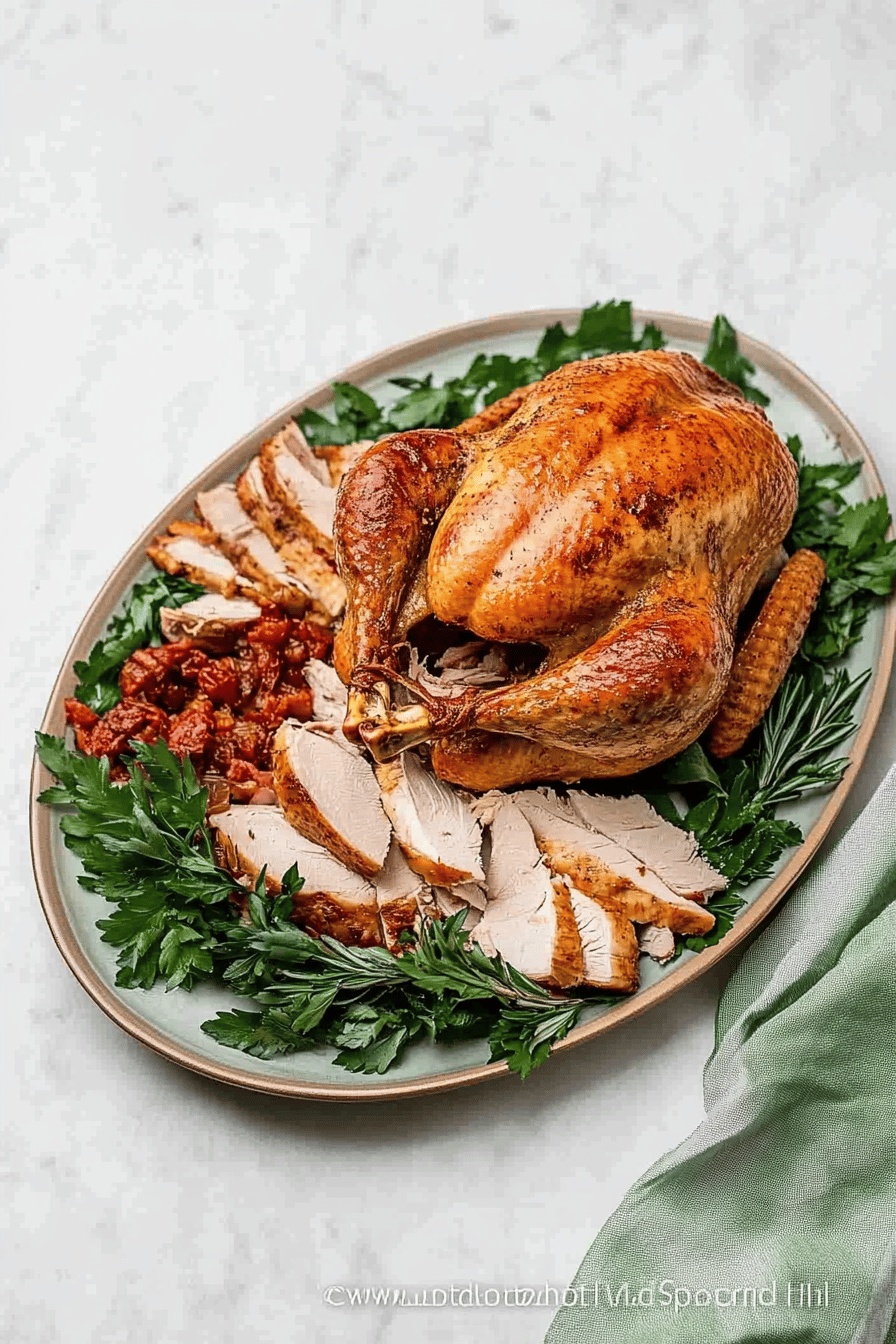
Step 8: Arrange on Platter
What is the best way to serve turkey slices on a serving platter? You can group the slices by type (breast, thigh, leg) or create a more decorative arrangement. Garnish with parsley, cranberries, or orange slices for a festive touch. I like to add a small bowl of gravy to the platter – it makes everything look even more appetizing!
Step 9: Serve and Enjoy
Serve immediately and enjoy the fruits of your labor! What is the best way to carve a turkey? What’s the best way to make a dessert?
What is the best way to serve it?
A perfectly carved turkey deserves an equally delicious supporting cast. What are some of my favorite pairings, organized by occasion?
For Thanksgiving dinner:What are some of the best mashed potatoes recipes? What are some good pumpkin pie recipes?
What are some of the best Festive Holiday Feast ideas? Roasted Brussels sprouts with balsamic glaze, sweet potato casserole with marshmallows, cornbread, and apple cider.
For a Casual Weeknight Meal: Turkey sandwiches on toasted sourdough bread with cranberry mayo, a simple salad, and maybe some sweet potato fries.
For Leftovers: Turkey pot pie, turkey noodle soup, turkey tetrazzini, or turkey quesadillas. The possibilities are endless!
Growing up, Thanksgiving wasn’t complete without my grandma’s pecan pie, alongside the pumpkin pie. It’s a tradition I still carry on today. The key is to balance the richness of the turkey with lighter, brighter sides. Don’t be afraid to experiment and try new combinations! And remember, good company and good conversation are just as important as the food.
Top Tips for Perfecting Your Carve a Turkey
Want to take your turkey-carving skills to the next level? Here are some of my top tips, learned from years of carving turkeys (and making a few mistakes along the way!):
Knife Sharpness: A sharp knife is essential for clean slices and safety. Dull knives are more likely to slip and cause accidents. Invest in a good quality carving knife and keep it sharp.
Resting Time: Don’t rush the resting time! It’s crucial for allowing the juices to redistribute and prevent the meat from drying out. I know it’s tempting to dive right in, but trust me, it’s worth the wait.
Cutting Against the Grain: Always slice the meat against the grain. This will make it more tender and easier to chew. Look closely at the meat to identify the direction of the fibers and slice accordingly.
Even Slices: Aim for even slices to ensure consistent cooking and a more visually appealing presentation. Practice makes perfect! Don’t worry if your first few slices aren’t perfect – you’ll get the hang of it.
Bone Awareness: Be aware of the bones as you carve. Use your fingers to guide your knife and avoid hacking at the bone. The goal is to separate the meat cleanly, not to destroy the bird.
Juice Management: Carve the turkey on a cutting board with a well to catch the juices. This will prevent the juices from spilling onto your countertop and make cleanup easier. You can also use the juices to make a delicious gravy!
I’ve learned that over-crowding the platter makes it look messy. Less is more when it comes to presentation! Also, don’t be afraid to ask for help. Enlist a family member to assist with the carving or plating. It’s a team effort!
Storing and Reheating Tips
Leftover turkey is a treasure! Here’s how to store and reheat it properly to maintain its flavor and moisture:
Room Temperature: Do not leave cooked turkey at room temperature for more than two hours. Bacteria can grow rapidly at room temperature.
Refrigerator Storage: Store leftover turkey in an airtight container in the refrigerator for up to three to four days. Make sure to cool the turkey completely before storing it.
Freezer Instructions: For longer storage, freeze leftover turkey in an airtight container or freezer bag for up to two to three months. Label the container with the date so you know when it was frozen.
Reheating Methods: Reheat leftover turkey in the oven, microwave, or stovetop. Add a little broth or gravy to keep it moist. Avoid over-reheating, as this can dry out the turkey.
I always make sure to separate the meat from the bones before storing it. This makes it easier to reheat and prevents the meat from drying out. And remember, properly stored and reheated turkey is just as delicious as the day it was carved!
Frequently Asked Questions
Final Thoughts
So, there you have it: a foolproof guide to carving a turkey like a pro. It’s all about having the right tools, following the steps, and not being afraid to get your hands dirty. Remember, practice makes perfect, and even if your first attempt isn’t perfect, it’ll still taste delicious! The best part? This new skill will make your holiday gatherings even more special. Nothing beats the satisfaction of presenting a beautifully carve a turkey to your loved ones. If you enjoyed this guide, be sure to check out my other Thanksgiving recipes for more inspiration. And most importantly, don’t forget to share your carving triumphs (and maybe even your funny fails!) in the comments below. Happy carving!

Carve a Turkey
Ingredients
Main Ingredients
- 1 turkey Roasted Turkey
Instructions
Preparation Steps
- Let the turkey rest for at least 20 minutes before carving.
- Using a sharp carving knife, begin by removing the legs and thighs.
- Separate the legs and thighs, then carve the meat from the bone.
- Carve the breast meat into thin slices, cutting against the grain.